Step-by-step guide: How to define hyperlinks to your files
To improve the usefulness of your documentation, you can provide hyperlinks to supplemental files that are located outside your documentation. You can display these documents or make them available to download.

Using the “Hyperlink” button in the “Insert” ribbon tab, you can access the hyperlink dialog.
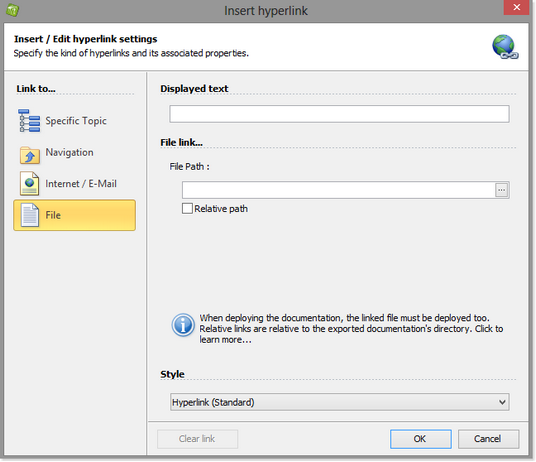
Click File in menu along the left-hand side of your window.
Select the file to link to by clicking the browse button to the far right of ‘File path’ and navigate to the document. After you select it, the document name and path are displayed.
In order for readers to access the file, you must place it the correct folder when you deploy your documentation:
- If you plan to place the file within a sub-folder of your documentation, click ‘Relative path.’
- If the file will not be placed within a sub-folder, leave this box blank. The full absolute file path is required.
Click OK in the lower right-hand corner of the window to save the new hyperlink and close the window.
Follow the steps outlined above to maintain the hyperlink.
To remove the hyperlink, click Clear link in the lower left-hand corner of the window.
HelpNDoc makes it easy for you to create hyperlinks to topics within your documentation, web pages, and create e-mail messages. The steps for defining these types of hyperlinks are outlined in other step-by-step guides:
- How to define hyperlinks to specific topics
- How to define hyperlinks to relative topics
- How to define hyperlinks to web pages and e-mail